Showing posts with label mvc. Show all posts

Saturday, 23 November 2013

Implementation of CSS in HTML Helper in MVC


Implementation of CSS in HTML Helper in MVC

If we see the all controls which we created using HTML Helper, they all are overloaded. There is overload method in which we pass HtmlAttribute of type object. In this object we pass the object in which we define the style of control.

For example:-

@Html.Label("Enter your First name", new { style = "background-color:green; color:white; font-family:Arial" })

Similarly we can pass the CSS style to each control.
If we want to pass CSS class to any Control then we can use this code in following way:-
First create the CSS file. I added the CSS file name TechAltum in which I added one CSS code for Label

.LableStyle { background-color:green; color:white; font-family:Arial
}

Now pass this class code to the control

Thursday, 21 November 2013

Use of Model using strongly view in MVC

Use of Model using strongly view in MVC

In my last article I discussed model in a simply way. In this example I am going to explain model using strongly view.

For this example I am taking the previous example in which I have created the model class named EmployeeData.

In this example after creating the model class, create view where you want to use this model. So go to index method->right click on it->add view.


Figure 1

In this view check the option creates a strongly-typed view and selects your model from dropdownlist.

Note: - sometime it happened that model class do not show in dropdownlist. In this situation kindly build your project and then again try.

After adding this view you can see that it automatically added @model object for this 
class which you provided in strongly view.

Now create the object of this class in index method, assign data to the variable and then pass this object to the view.

Model in MVC in Simple Way

Model in MVC in Simple Way

In MVC ‘M’ stands for Model. In MVC model is used to create logic class for any MVC application. We can put all our project logic called business logic in model in MVC.

In this example I am creating model in a simple way. In my next article I will discuss model with strongly view.

For this example I am taking controller name Home and method name is Index and create view for this index method.

To add model Right click on model folder from solution explorer ->go to add->class


Figure 1

Give a proper name to the class. I have given the name EmployeeData. In this class I have created some variable to store data. The code of this class is as follows:-

using System;
using System.Collections.Generic;
using System.Linq;
using System.Web;

namespace MvcApplication5.Models
{
    public class EmployeeData
    {
        public int EmpId;
        public string EmpName;
        public string EmpDept;
        public int salary;
    }
}

Tuesday, 19 November 2013

Pass Data from Controller to View using ViewBag in MVC

Pass Data from Controller to View using ViewBag in MVC

In my last article I explain how to send data from view to controller using ViewData. In this article we will discuss how we can send data using ViewBag. ViewBag used dynamic property which introduced in C# 4.0 and it is typed object which decide type at runtime. This is the reason we didn't get compile time error.

It is actually maintain a dynamic ViewData Dictionary internally so you can say that it’s a wrapper around ViewData.

For example:-

Create a controller name Home and create view name Index.

In this view create a list of type string in which stores the Department Name.

using System;
using System.Collections.Generic;
using System.Linq;
using System.Web;
using System.Web.Mvc;

namespace MvcApplication5.Controllers
{
    public class HomeController : Controller
    {
      
        public ActionResult Index()
        {
            List<string> dept = new List<string>()
            {"HR","Sales","Developer"};

            ViewBag.dept_name = dept;
            return View();
        }

    }
}

Friday, 8 November 2013

If-else statement and Looping in Razor in MVC


If-else statement and Looping in Razor

In my last article I discussed how we can use programming statement in Razor. In my last article we declared some variable and perform some calculation on it. In this tutorial I am going to discuss how we can use if-else statement and looping.

If-Else Statement in Razor

As we declared variable using @, similarly we can declare if else statement using @.

Note: - I am taking previous article code as an example. If you are directly reading it then kindly go through last article first.

For example:-

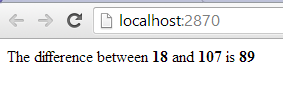
In this example I am taking two numbers and calculating the difference between them.

@{
    Layout = null;
}

<!DOCTYPE html>

<html>
<head>
    <meta name="viewport" content="width=device-width" />
    <title>Index</title>
</head>
<body>
  
   @{
      
       int num1 = 18, num2 = 107;
       int num3;
      
    }

  @if (num1 > num2)
  {

      num3 = num1 - num2;

  }
  else
  {

      num3 = num2 - num1;
  }

    The difference between <b> @num1</b> and <b>@num2</b> is <b>@num3</b>

</body>
</html>

The output of this code


Figure 1