Showing posts with label Mvc training. Show all posts

Friday, 8 November 2013

If-else statement and Looping in Razor in MVC


If-else statement and Looping in Razor

In my last article I discussed how we can use programming statement in Razor. In my last article we declared some variable and perform some calculation on it. In this tutorial I am going to discuss how we can use if-else statement and looping.

If-Else Statement in Razor

As we declared variable using @, similarly we can declare if else statement using @.

Note: - I am taking previous article code as an example. If you are directly reading it then kindly go through last article first.

For example:-

In this example I am taking two numbers and calculating the difference between them.

@{
    Layout = null;
}

<!DOCTYPE html>

<html>
<head>
    <meta name="viewport" content="width=device-width" />
    <title>Index</title>
</head>
<body>
  
   @{
      
       int num1 = 18, num2 = 107;
       int num3;
      
    }

  @if (num1 > num2)
  {

      num3 = num1 - num2;

  }
  else
  {

      num3 = num2 - num1;
  }

    The difference between <b> @num1</b> and <b>@num2</b> is <b>@num3</b>

</body>
</html>

The output of this code
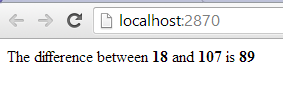


Figure 1

Thursday, 7 November 2013

Get Version of MVC through Code


Get Version of MVC through Code

If we need to gets the version of the MVC application using code or if we want to print the Version of MVC then we can show it using code.

For Example:-

Create a Controller name home and Create View name Index and add the following code:-

Home Controller/Index

using System;
using System.Collections.Generic;
using System.Linq;
using System.Web;
using System.Web.Mvc;

namespace MvcApplication1.Controllers
{
    public class HomeController : Controller
    {
        public ActionResult Index()
        {
            Response.Write("Current Version of MVC is= "+typeof(Controller).Assembly.GetName().Version.ToString());
            return View();
        }

    }
}

The output of this code


Figure 1


In this way using this code we can show version of MVC.

Wednesday, 6 November 2013

Fetch values from View in Controller using Request


Fetch values from View in Controller using Request

In this article I will explain how to fetch data from controls which are on View to Controller using Request.

In my last article I explain the same example using FormCollection. Request objects work with both GET and POST Method.

For Example:-

In this example I have created the Home Controller and in this I have created index view.

In this view I have created the following form in which I am taking first name and last name from the user.  For each control I have set the property name. This property I will use in form collection to fetch the data.

@{
    Layout = null;
}

<!DOCTYPE html>

<html>
<head>
    <meta name="viewport" content="width=device-width" />
    <title>Index</title>
</head>
<body>
    <form method="get" action="Welcome\Index">
        <table>
            <tr>
                <td>Enter First Name</td>
                <td><input type="text" id="fname_id" name="fname_name" /></td>
            </tr>
             <tr>
                <td>Enter Last Name</td>
                <td><input type="text" id="lname_id" name="lname_name" /></td>
            </tr>
             <tr>
                <td></td>
                <td><input type="submit"  /></td>
            </tr>
        </table>
    </form>
</body>
</html>

In action I have set the welcome controller and index view. So I have created welcome controller and create index view.

Fetch values from View in Controller using Form Collection


Fetch values from View in Controller using Form Collection

In this article I will explain how to fetch data from controls which are on View to Controller. There are many ways to fetch these values and Form Collection is the one of them.

In my one of last article I explained the GET and POST method. And in POST method I showed that data stored in FORM if Method set as POST. I also explained that data stored using the controls property Name.

Note: - if you are not aware the concept of GET and POST in MVC then kindly Click Here.

As we know that if our method set as POST then all data stored in Form so we can access this data on our controller using FormCollection.

Monday, 4 November 2013

Use of Action in Form Tag in MVC

Use of Action in Form Tag in MVC

In my last article I explained the Form Tag and use of GET and POST method. In this article I am going to explain the use of Action Method in MVC.

Action is the element of Form Tag and it is used to redirect page when we submit the button.

Syntax of Action:-

 Action=”Controller\View”

For example:-

I have created two controllers in my MVC application. One is Home controller and another is Welcome controller.

From Home Controller after pressing the submit button I want it to redirect it on Welcome Controller. For this in Form Tag I have to add the action element and setting the controller and view.

Code of Index View of Home Controller

@{
    Layout = null;
}

<!DOCTYPE html>

<html>
<head>
    <meta name="viewport" content="width=device-width" />
    <title>Index</title>
</head>
<body>
    <form method="post" action="Welcome\Index">
        <table>
            <tr>
                <td>Enter First Name</td>
                <td><input type="text" id="fname_id" name="fname_name" /></td>
            </tr>
             <tr>
                <td>Enter Last Name</td>
                <td><input type="text" id="lname_id" name="lname_name" /></td>
            </tr>
             <tr>
                <td></td>
                <td><input type="submit"  /></td>
            </tr>
        </table>
    </form>
</body>
</html>

Form Tag in MVC View and use of GET and Post method in MVC


Form Tag with some input tag in MVC View and use of GET and POST Method in MVC

In MVC we use GET and POST Method to Each Request and Reply. If we do not set any method for MVC Application then it uses GET Method by Default.

For Example:-

Create a simple MVC Application. Create Home controller and create index view. Simply print Some String in this view and Execute this code.

Note: - To understand basic of MVC kindly read my previous articles: - Controller in MVC and View in MVC

After executing the code you will get following output.


Figure 1

Now press the F12 to open the DevTool. Developers Tool is a Debugging Tool in Chrome which provides accessibility of Web Application in Detail.


Figure 2

Now create another view in this application. Create another method name Welcome in Home Controller and create view for this method. Execute the application and request the Welcome View and then press F12